Inaugural Lunch Menu

Here's the lunch menu that followed today's inaugural ceremonies. While this tradition dates as far back as 1897, when the Senate Committee on Arrangements first gave a luncheon for President McKinley and several other guests at the U.S. Capitol, it did not begin in its current form until 1953.

Also here's a link with the recipes, which I think is very cool. It's seasonally appropriate, and as I would expect, uses American ingredients and wine. Very nice.


Luncheon Menu

First Course
Seafood Stew
paired with
Duckhorn Vineyards 2007 Sauvignon Blanc, Napa Valley

Second Course
A Brace of American Birds (pheasant and duck)
served with Sour Cherry Chutney and Molasses Sweet Potatoes
paired with
Goldeneye 2005 Pinot Noir, Anderson Valley

Third Course
Apple Cinnamon Sponge Cake and Sweet Cream Glace
paired with
Korbel Natural "Special Inaugural Cuvee"
California Champagne

Pizza Perfection

I've always had a love for gourmet pizza so a couple of weeks ago I made a recipe from the 1980's that's the best dough recipe I've ever made or eaten.

I'm constantly in search of the Holy Grail of pizza. On my last trip out west I shot some pictures of pizza at Zuni Cafe in San Francisco and another at Chez Panisse in Berkeley, although both pizzas were excellent I kept thinking about and craving the pizza I made at Fedora Cafe in the 80's, it truly was the best. In 1985 we were listed as one of the top 10 restaurants in the country by USA Today and the pizzas were mentioned in the article. It was a new frontier for pizzas at the time, to actually serve them in a white table cloth restaurant was unheard of.

I felt compelled to teach someone how to make the "Real Deal", the student would be my 16 year old son Dylan. Young Dylan is a foodie (which scares me), a photographer, a student, and an athlete. His converging interests in food and photography has been documented on his food blog, Great Food a Millennial Perspective.

Dylan actually got the technique of making the rounds pretty quickly, I can remember teaching cooks how to do this and sometimes the learning curve was extraordinary. The key to rounding is to let gravity do the work to stretch the dough.

The idea to make the BBQ pizza with crispy shortrib actually came from the student, it was a great idea but I also wanted to show him some classics like pizza margherita as well as pizzas with an ethnic twist.

Below are some photo's I pulled from a post on Dylan's site, thanks son.

P.S. - Dylan, I've noticed that my cookbooks and knives are disappearing at an alarming rate, do you have them? If so, we need to talk.

The second proofing of the dough


Blind baking the dough with herbs, extra virgin olive oil, mozzarella and provolone

BBQ Crispy Shortrib PizzaSweet Baby Ray's BBQ sauce, fontina, provolone, parmesan, red onion

Pizza Margherita
Tomato sauce, fontina, provolone, parmesan, fresh tomatoes, basil, pine nuts


Chorizo PizzaTomato sauce, fontina, provolone, parmesan, red onion, pine nuts


Fig & Gorgonzola Pizza
Fig Puree, Prosciutto, fontina, provolone, parmesan, gorgonzola

So, You Wanna Make Gnocchi's Huh?

Gnocchi's are such a good hearty winter item, and there's versions-a-plenty such as ricotta, pumpkin, potato, or Keller's version which is more of a pate choux. Their preparation can be as simple as sauteed with brown butter and sage, or something more complex like Braised Shortribs with Day Boat Scallops and Gnocchi's, which we recently prepared & devoured and subsequently placed on the menu.

Below is a basic potato gnocchi recipe with fresh chives. Working with as little flour as possible is the key to producing light gnocchi's, too much flour and they're little gut bombs. Avoid the temptation to add more flour if the dough seems a little sticky at first, the potatoes will pull the moisture in and make the dough more manageable. Also, be kind & gentle to the dough, don't overwork it, don't apply too much pressure when rolling it out.

Making Potato Gnocchi's - makes about 225 pcs.

Idaho Baking Potatoes, 60 ct, cooked peeled, warm - 2-3/4 lb
Egg Yolks - 1-1/2 cups
Flour, all purpose - 2-1/2 cups
Kosher Salt - 2 TBL
Fresh Chives, minced - 1/4 cup
Flour, all purpose - as needed

Bake potatoes in a 350° oven for 1 hour or until completely done. Do not season or oil the potatoes prior to baking them.

Let potatoes rest for 15 minutes after they come out of the oven but do not let them cool down to room temp before peeling or it will be hard to put them through the ricer.


Weigh peeled potatoes out, cut potatoes into small enough pieces to fit into the ricer, press all of the potatoes through the ricer into a large mixing bowl, let potatoes cool to room temperature before proceeding to the next step.


Mix egg yolks into potatoes with a rubber spatula, blend thoroughly until all of the eggs are evenly incorporate into the potatoes.


Cut half of the flour into the potato mixture using a rubber spatula, add the remainder of the flour, work the flour in by hand, knead the mixture in the bowl briefly until it forms into a dough.

Add the salt & chives and knead into the dough until evenly incorporated.


Flour a full sized cutting board with just enough flour to keep dough from sticking, turn the dough out of mixing bowl onto the floured surface and roll the dough until it forms a large "Log" the length of the cutting board.


Lightly flour the cutting board with only enough flour to keep the dough from sticking, too much flour will make the Gnocchi's heavy. Cut 6-8 oz pieces of the dough off and roll by hand until they are the length of the cutting board and 3/4" thick.


Using a French knife cut gnocchi dough into 1/2 inch pieces.


Bring water to a boil in a kettle. Place gnocchi's in boiling water. Let gnocchi's boil until they float (about 1 minute) and then continue to boil for 1 more minute.


Using a skimmer remove gnocchi's from water.


Place gnocchi's in an ice bath. Drain and coat with a small amount of olive oil. Chill until ready to use.

Bacon Explosion

Last week two guys here in Kansas City released a recipe called bacon explosion. Here's a youtube link to the story from the local news.

This is one of those over-the-top recipes, these guys are mad scientist and avid pork lovers. I felt compelled to pull this article together from several different sources for future use.

The 
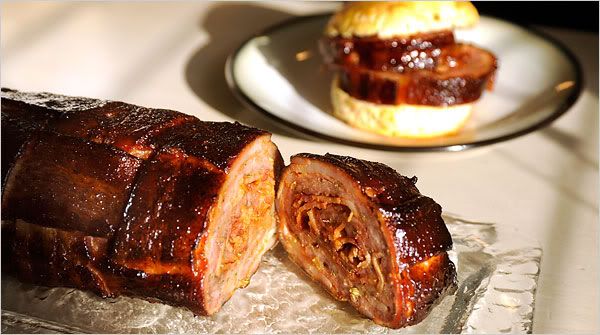
New York Times featured the recipe in an article and it became one of their most emailed stories. Picture by Don Ipock for The New York Times.

Here's the recipe and photo's from the BBQ Addicts web site.
Bacon Explosion: The BBQ Sausage Recipe of all Recipes
by Jason on December 23, 2008

2 pounds thick cut bacon
2 pounds Italian sausage
1 jar of your favorite barbeque sauce
1 jar of your favorite barbeque rub


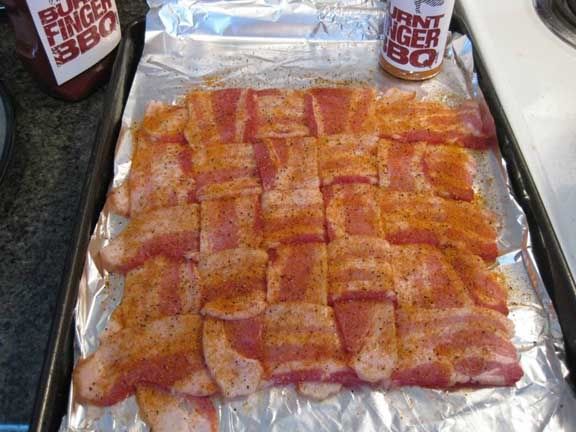
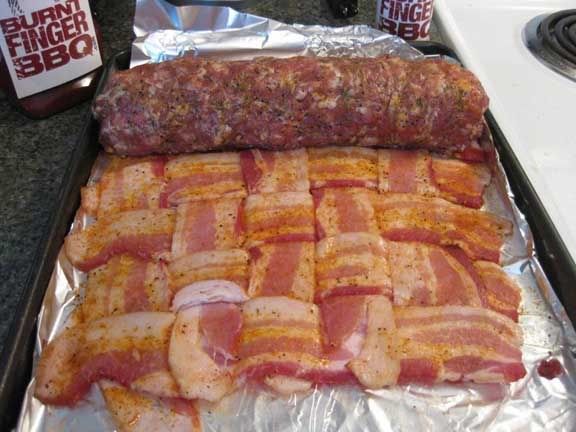
To kick off the construction of this pork medley you’ll need to create a 5×5 bacon weave. If the strips you’re using aren't as wide as the ones pictured, then you may need to use a few extra slices to fill out the pattern. Just make sure your weave is tight and that you end up with a nice square shape to work with.


The next step is to add some barbeque seasoning on top of your bacon weave. Being the barbeque addict that I am, I whipped up a batch of Burnt Finger BBQ’s competition pork rub for this special occasion. Seeing as not everyone has the time, or the expertise, to create a tasty rub of their own, I would recommend trying Bad Byron?s Butt Rub, Rendezvous Famous Seasoning, or Steven Raichlen's All-Purpose Rub.


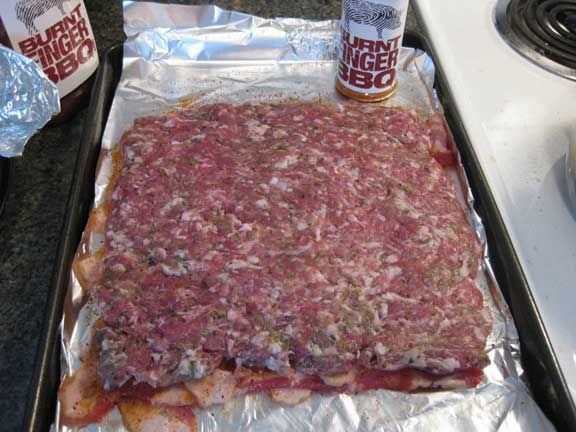
Now that you’re pork is well seasoned, it’s time to add more pork. Take two pounds of Italian sausage and layer it directly on top of your bacon weave. Be sure to press the sausage to the outer edges of the bacon creating a patty that is the same thickness all the way across. Most grocery stores carry loose sausage, so just pick out one you like. I chose to go with a mild sausage, but spicy would work just the same. If you really want to get crazy, take a stab at making your own homemade sausage.


Next up is bacon layer number two. Take the remaining bacon slices and fry them up the same way you would for breakfast (or lunch, or dinner, or a midnight snack). If you like soft bacon, make it soft. If you like crunchy bacon, make it crunchy. If you like your bacon burnt to hell so the smoke detectors go off, then burn it to hell so the smoke detectors go off. These pieces are going to be a major part of the inner flavor of our sausage fatty, so cook them your favorite way. Personally, I like my bacon right at the point when it starts to get crispy, but hasn’t quite lost all of the softness yet. Regardless of how well done you like yours, you’ll need to crumble or chop the cooked strips into bite size pieces and place on top of the sausage layer. (Note-It’s okay, and encouraged, to snack on these pieces while your chopping/crumbling. But keep in mind that once those bacon morsels touch the raw sausage, you’ll need to resist all temptations to nibble. This can and will be difficult, but hospital trips are no fun, so stay strong.)


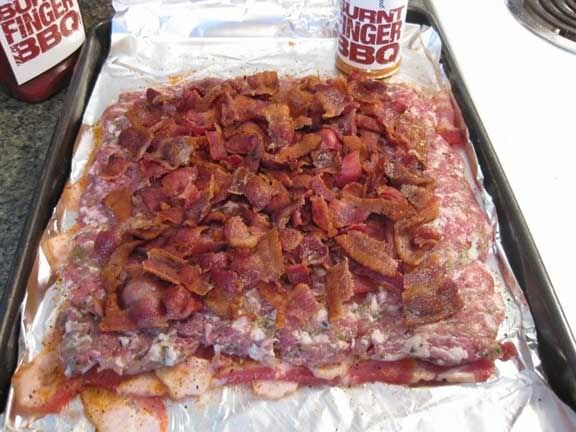
Since this is a barbeque recipe, we need to add another layer of barbeque flavor. Take your favorite sauce and drizzle it all over the top of the bacon pieces. Personally, I prefer to use Burnt Finger BBQ’s homemade competition sauce, but if you’re torn on what brand to use I recommend Cowtown, Blues Hog, and Fiorella’s Jack Stack. Once you’ve sauced the bacon, sprinkle on some more of the barbeque seasoning you used on the bacon weave.


Now comes the fun part. Very carefully separate the front edge of the sausage layer from the bacon weave and begin rolling backwards. You want to include all layers EXCEPT the bacon weave in your roll. Try and keep the sausage as tight as possible and be sure to release any air pockets that may have formed. Once the sausage is fully rolled up, pinch together the seams and ends to seal all of the bacon goodness inside.


At this point we can start to see the final shape of our Bacon Explosion, but we’re missing one key item. To complete the construction process, roll the sausage forward completely wrapping it in the bacon weave. Make sure it sits with the seam facing downward to help keep it all sealed up.


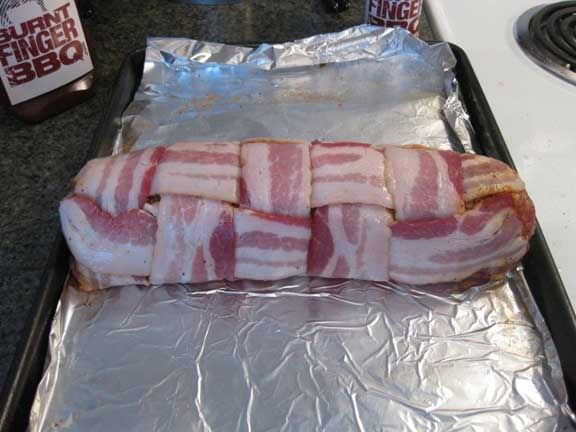
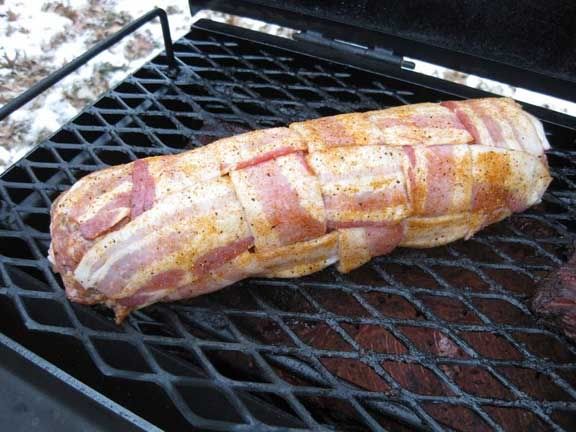
Sprinkle some barbeque seasoning on the outside of the bacon weave, and now this bad boy is ready for the smoker. Cook your Bacon Explosion at 225 degrees in a constant cloud of hickory smoke until your Thermapen gives an internal temperature reading of 165 degrees. Normally this will take about 1 hour for each inch of thickness, but that could vary depending on how well you maintain your fire and also how many times you open the smoker to take a peek. Mine took about 2.5 hours, which was right on target with its 2.5 inch diameter.


Now that our Bacon Explosion is fully cooked, we need to add some finishing flavors. Remember that barbecue sauce we used for inner flavor? We’ll be using that same sauce to glaze the cooked bacon weave. Using a basting brush, coat the entire surface with a thin layer of sauce. Sweet sauces are loaded with sugars, so they’ll give your fatty a nice glossy finish. Spicy and vinegar based sauces don’t contain as much, so they won’t set up as well. If you’re dead set on using those sauces, just cut them with a bit of honey and you’ll get the same effect.


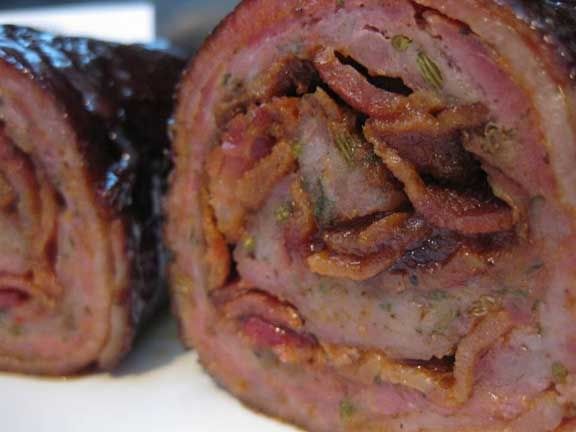
Slice the Bacon Explosion into quarter to half inch rounds to serve. If your roll was good and tight, you should now see a nice bacon pinwheel pattern throughout the sausage. Obviously pork is best served by itself, but if you feel the need to make this meat monster into a sandwich, try placing a couple Bacon Explosion slices on a warm Pillsbury’s Grands Biscuit. You’ll reach pork Nirvana is no time flat!

I Want That!

More good stuff from my fish guy.

"That’s Right…you want strange…I’ve got it!"

1 to 3 pound fish / G&G / Sweet White Flesh / Eats Like Black Bass / FRESH!
Be the first on your block to offer Scorpion Fish today!